If important emails keep landing in spam or never show up at all, whitelisting, also called allowlisting, is usually the fastest fix.
This guide walks you through the current, reliable ways to do it, with mobile reading and real inbox behavior in mind.
Each section starts with the quickest option, then expands with alternatives and context so you can adapt if your screen looks different.
What Whitelisting Does and When It Helps
Whitelisting (allowlisting) tells your email app that messages from a specific sender should be trusted.
In practice, it changes how your inbox treats those emails.
It doesn’t magically force delivery in every situation, but does solve the most common inbox-level problems.

Whitelisting:
- Stops your email app from sending messages to Spam or Junk.
- Trains your inbox to treat future emails from that sender as legitimate.
- Improves consistency for ongoing conversations or notifications.
When whitelisting doesn’t help:
- If the message is blocked before it reaches your inbox.
- If your work or school email has strict security rules.
- If the sender’s email setup is broken or flagged as unsafe.
Tools like SureForms, SureCart, and CartFlows depend on reliable email, so inbox rules and delivery setup need to work together.
If you’re at the beginning of your email marketing journey, SureContact makes it easy to manage and nurture subscribers.
Before You Start
Different email apps behave differently and some methods only work if you already have a message from the sender.
If you’re performing email outreach or marketing using your email list, allowlisting won’t help.
For most other situations, it can.
Take a moment to confirm the basics before going any further.
Things to check first:
- Do you already have at least one email from the sender?
- Do you want to allow just one address or every email from the domain, like @company.com?
- Is this a work or school email account where an administrator controls filtering?
Once you know those answers, the steps below will make more sense and work more reliably.
If you manage a site built with ZipWP or Starter Templates, this is also the right time to check which address your site sends from. Consistency matters!
Want to convert more visitors into subscribers? Convert Pro makes it easy!
Whitelisting in Gmail
The most reliable Gmail method is creating a filter that never sends the email to spam.
Gmail changes its interface often, but filters remain the most stable option. This approach works even if the email arrives in Spam or Promotions.
Fastest Method on Desktop

This is the approach we recommend for Gmail users.
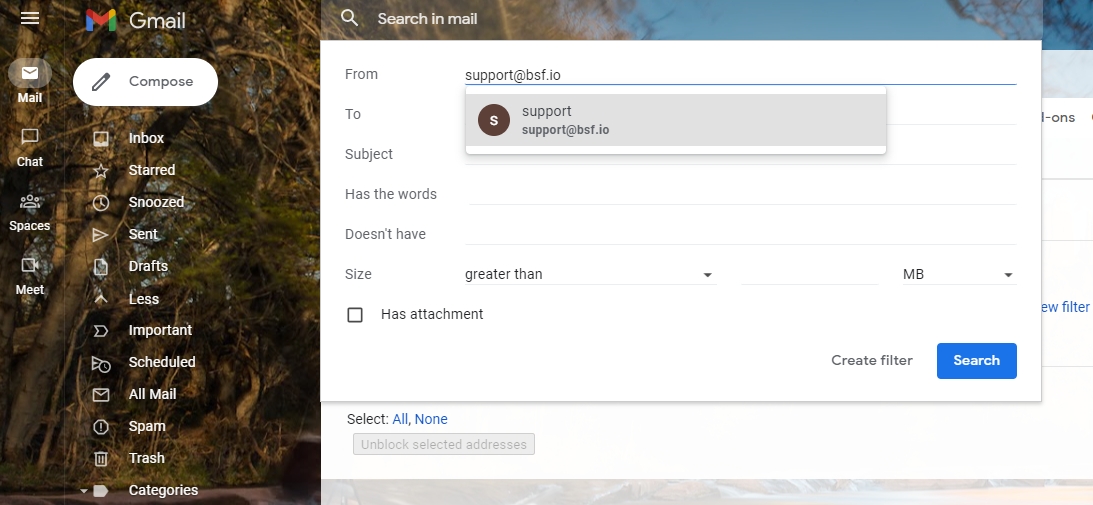
- Open Gmail and go to Settings
- Navigate to Filters and blocked addresses
- Select Create a new filter
- In the From field, enter the sender’s email or domain
- Check Never send it to Spam
- Save the filter
If You’re Using the Gmail Mobile App
The mobile app offers fewer options, but you can still influence filtering behavior.
Open the email, tap the three dots and choose Mark as Important.
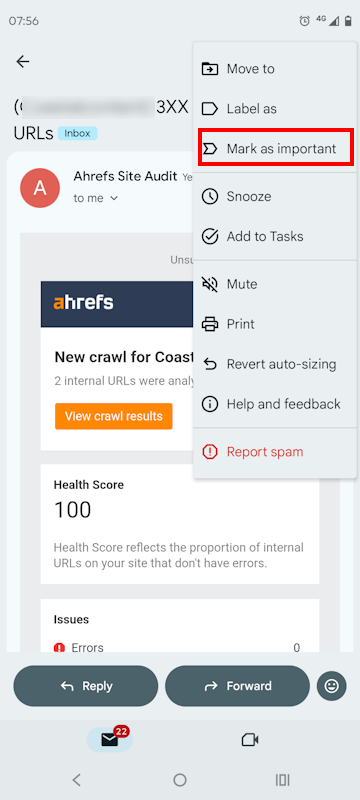
You can always remove the mark once the emails begin arriving in your inbox.
You can also use Move to move the email to your inbox and mark it as Not spam.
This trains Gmail’s filtering system, though it’s less precise than a desktop filter.
What About the Promotions Tab?
If emails land in Promotions instead of Primary, drag one message into Primary on desktop.
This method may take a few tries to stick, but it does work.
Confirm It Worked
After setting the filter, send or request a new message. Check Inbox, Spam, and Promotions to confirm the behavior has changed.
Whitelisting in Outlook
Outlook works best when you add senders through Safe Senders in settings.
Because Outlook exists in multiple versions, starting with the web interface gives you the most consistent results.
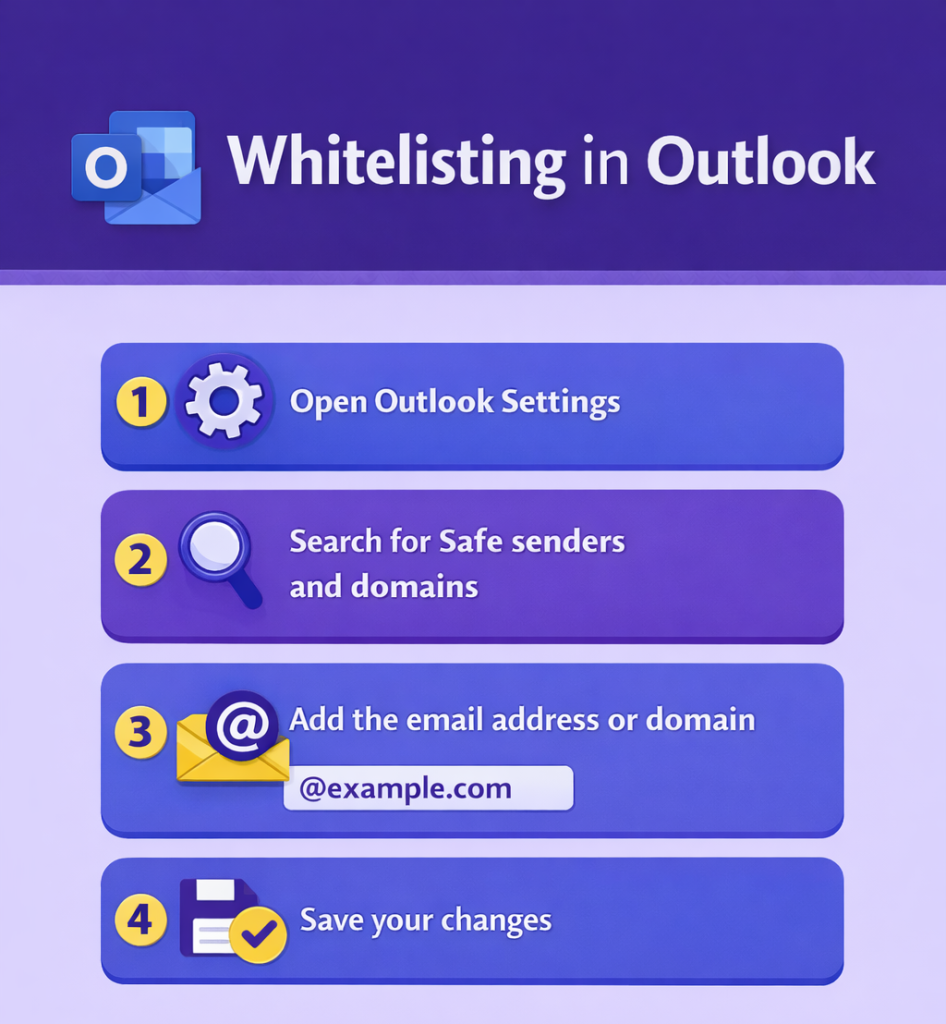
Web Outlook (Outlook.com Or Microsoft 365)
This method applies across devices once saved.
- Open Outlook Settings
- Search for Safe senders and domains
- Add the email address or domain
- Save your changes
This applies across devices and works well for ongoing communications handled through SureContact.
New Outlook for Windows
If you are using the newer Outlook experience:
- Open Settings
- Go to Junk email
- Add the sender under Safe senders
The wording may change slightly, but safe senders is the key phrase to look for.
Classic Outlook for Windows
If you already have the email:
- Right-click the message
- Select Junk
- Choose Never Block Sender
You can also add addresses manually through Junk Email Options and Safe Senders.
Outlook Mobile App
Mobile actions help short-term. For lasting results, always add the sender using Outlook on the web or desktop.
Confirm It Worked
Send a test message and check both Junk and Quarantine folders to make sure the rule is applied.
Whitelisting in Apple Mail and iOS Mail
Apple Mail doesn’t offer a single universal safe sender list. Rules matter here.
Apple’s approach depends heavily on whether you are using iCloud Mail, Gmail, Outlook, or another provider behind the scenes.
Quick Method for Apple Mail On Mac
This helps in simple cases:
- Add the sender to Contacts
- Mark them as a VIP
This improves visibility but is not always permanent.
Reliable Method Using Mail Rules on macOS

For consistent results, rules are the best option.
- Open Mail
- Go to Settings or Preferences
- Select Rules
- Create a new rule
- Set the condition to From contains the sender email or domain
- Set the action to Move message to Inbox
- Save and apply
This forces messages to bypass junk filtering on your Mac.
If the email is already in Junk:
- Swipe left in the email
- Select the More button and Mark
- Select the Mark as Not Junk button
iPhone and iPad Mail App
The iOS Mail app follows the rules of the mailbox provider.
Adding a sender to Contacts can help, but rules only exist on macOS.
If your mailbox is Gmail or Outlook, make sure you also apply the relevant web-based steps earlier in this guide.
Confirm It Worked
Request a new email and confirm it lands directly in Inbox without manual action.
Whitelisting in Yahoo Mail
Yahoo works best with filters that explicitly deliver messages to Inbox. Relying on marking emails as not spam alone is usually not enough.
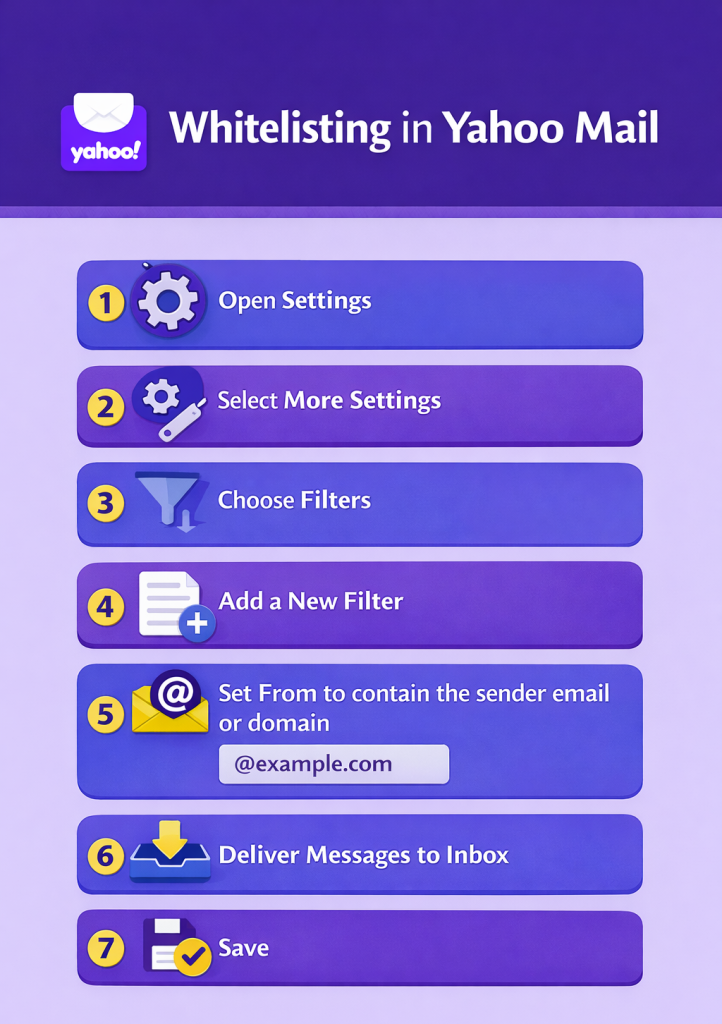
- Open Settings
- Select More Settings
- Choose Filters
- Add a new filter
- Set From to contain the sender email or domain
- Deliver messages to Inbox
- Save
If the email already landed in Spam, open it and click Not Spam to reinforce the rule.
Confirm It Worked
Future messages should now appear in Inbox automatically.
Whitelisting in Other Email Providers
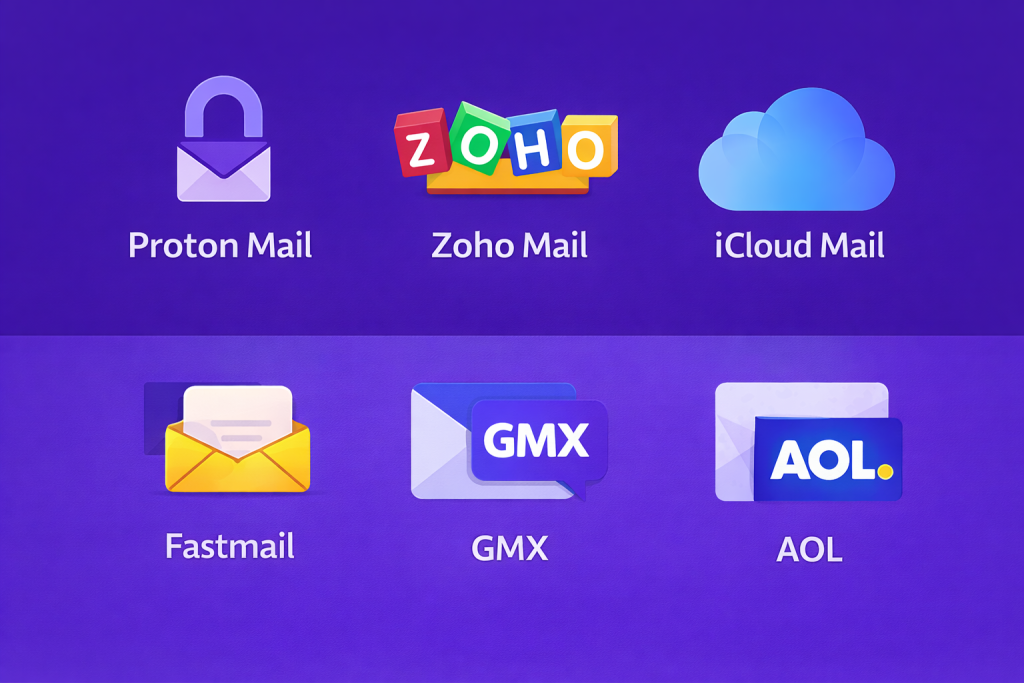
Most providers follow the same underlying logic, even if labels differ.
If your email service is not listed above, use this approach to quickly find the right option.
Start by looking for any setting labeled Safe senders, Allowed senders, or Trusted senders.
If they don’t exist, filters or rules are your next best option.
A reliable fallback process looks like this:
- Create a filter or rule where From contains the sender email or domain
- Set the action to move messages to Inbox
- Ensure the rule prevents spam classification
- Mark one existing message as not spam
- Add the sender to your contacts if available
This approach works for Proton Mail, Zoho Mail, iCloud Mail, Fastmail, GMX, AOL and most IMAP-based services.
If Whitelisting Doesn’t Work
When whitelisting fails completely, it usually means the email is blocked before it reaches you.
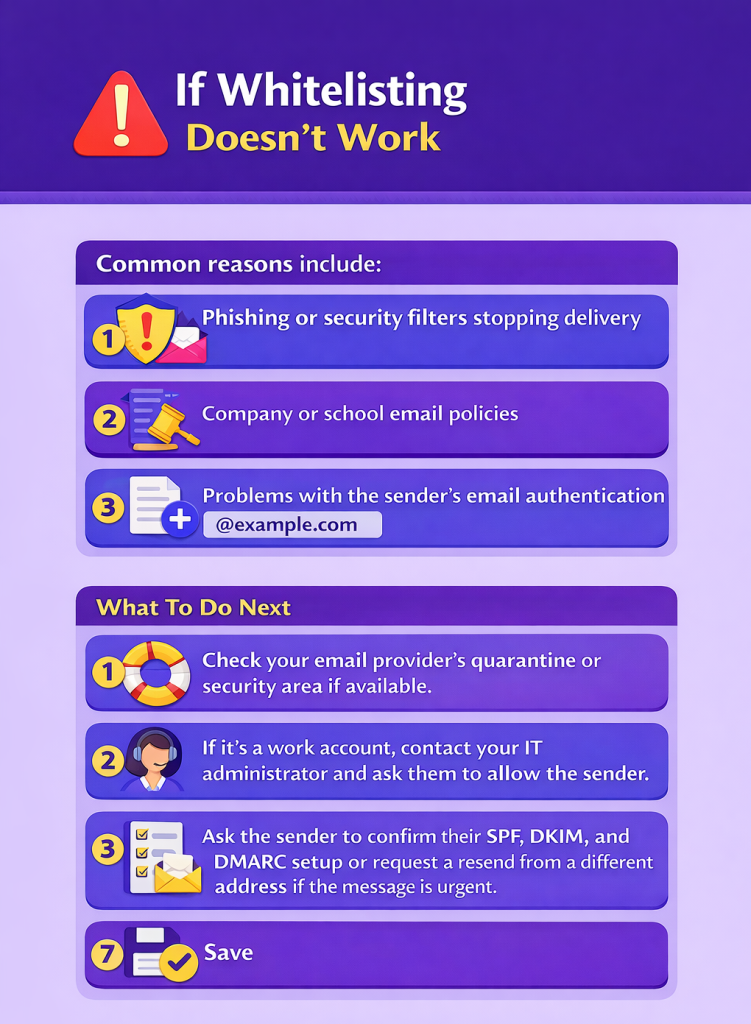
Common reasons include:
- Phishing or security filters stopping delivery
- Company or school email policies
- Problems with the sender’s email authentication
What To Do Next
Check your email provider’s quarantine or security area if available.
If it’s a work account, contact your IT administrator and ask them to allow the sender.
You can also ask the sender to confirm their SPF, DKIM, and DMARC setup or request a resend from a different address if the message is urgent.
For Website Owners and Businesses
Missed emails often mean missed revenue or missed customers.
If you’re not receiving form submissions, order confirmations, or booking notifications, inbox rules are only part of the picture.
Start by fixing delivery reliability, then help users help themselves.
Practical steps that work:
- Send emails from a consistent address and domain
- Use reliable delivery methods for transactional emails
- Add a short allowlist reminder on confirmation pages and emails
A simple line like “Please add [email protected] to your safe senders list” prevents many future problems.
If you’re running, or planning, an email marketing campaign, that last tip is essential!
Quick Final Checklist
Before you celebrate the win, double-check the basics:
- The sender or domain is added to a safe list or rule
- A filter or rule is active
- At least one message was marked Not spam
- You tested with a fresh email
If any step fails, revisit the relevant section above. Once configured correctly, you should not need to repeat this process for the same sender again.

Pratik Chaskar holds the pivotal role of CTO at Brainstorm Force, serving as the backbone of the company. Renowned for his organizational skills, strategic thinking, problem-solving attitude, and expertise in leading and executing plans, Pratik plays a crucial role in the BSF’s technological landscape.
Disclosure: This blog may contain affiliate links. If you make a purchase through one of these links, we may receive a small commission. Read disclosure. Rest assured that we only recommend products that we have personally used and believe will add value to our readers. Thanks for your support!


This article is dated March 20, 2019 however it mentions Outlook 2003/2007.
Are you planning an updated version of this article?
If so please cover Outlook desktop, Hotmail, Gmail, Yahoo mail, whatever the Apple mail client is, and also mobile devices as well as desktops.
Thanks
Sure thing. Thanks for commenting, Michael.
When I try to do this using Gmail I follow the directions exactly and I get a message saying “Trouble Creating Contact” and I don’t know what to do. Please Help !!!
That’s strange, Justin!
We would recommend checking once with Google Mail’s support on this matter.
Thank you for your help. this information fixed my problem.
Thank you for your efforts. It was very helpful 🙂
Thank you for reaching out and look forward to future info.
Thank you
Thanks for your help
You’re welcome Carol! 🙂
Thank you
You’re welcome!
Thanks
You’re welcome! 🙂
Thanks many many many
Thanks for your help
When I try to do this, “Select to send all mail to Inbox” is not an option. I have to choose a folder to move to and the inbox is not one of the options. Can you help?
Thanks
Thanks for Help.
Glad that it helped, Jelany!
Thank you for the help!
Glad that it helped! 🙂